
Ever wondered how to elevate your cozy night in beyond a simple mug of hot cocoa? Let’s be honest, we all love that warm, chocolatey hug in a cup, but sometimes… it feels a little basic. Studies show that visual appeal dramatically increases enjoyment of food, and what’s more visually appealing than a beautifully arranged hot chocolate charcuterie board? This isn’t just a sweet platter; it’s an experience! Today, we’re diving deep into how to build a hot chocolate charcuterie board, transforming a classic winter drink into a show-stopping centerpiece that’s as delicious as it is delightful. Get ready for a whirlwind of marshmallows, cookies, and chocolatey goodness!
Ingredients List: Your Sweet Arsenal
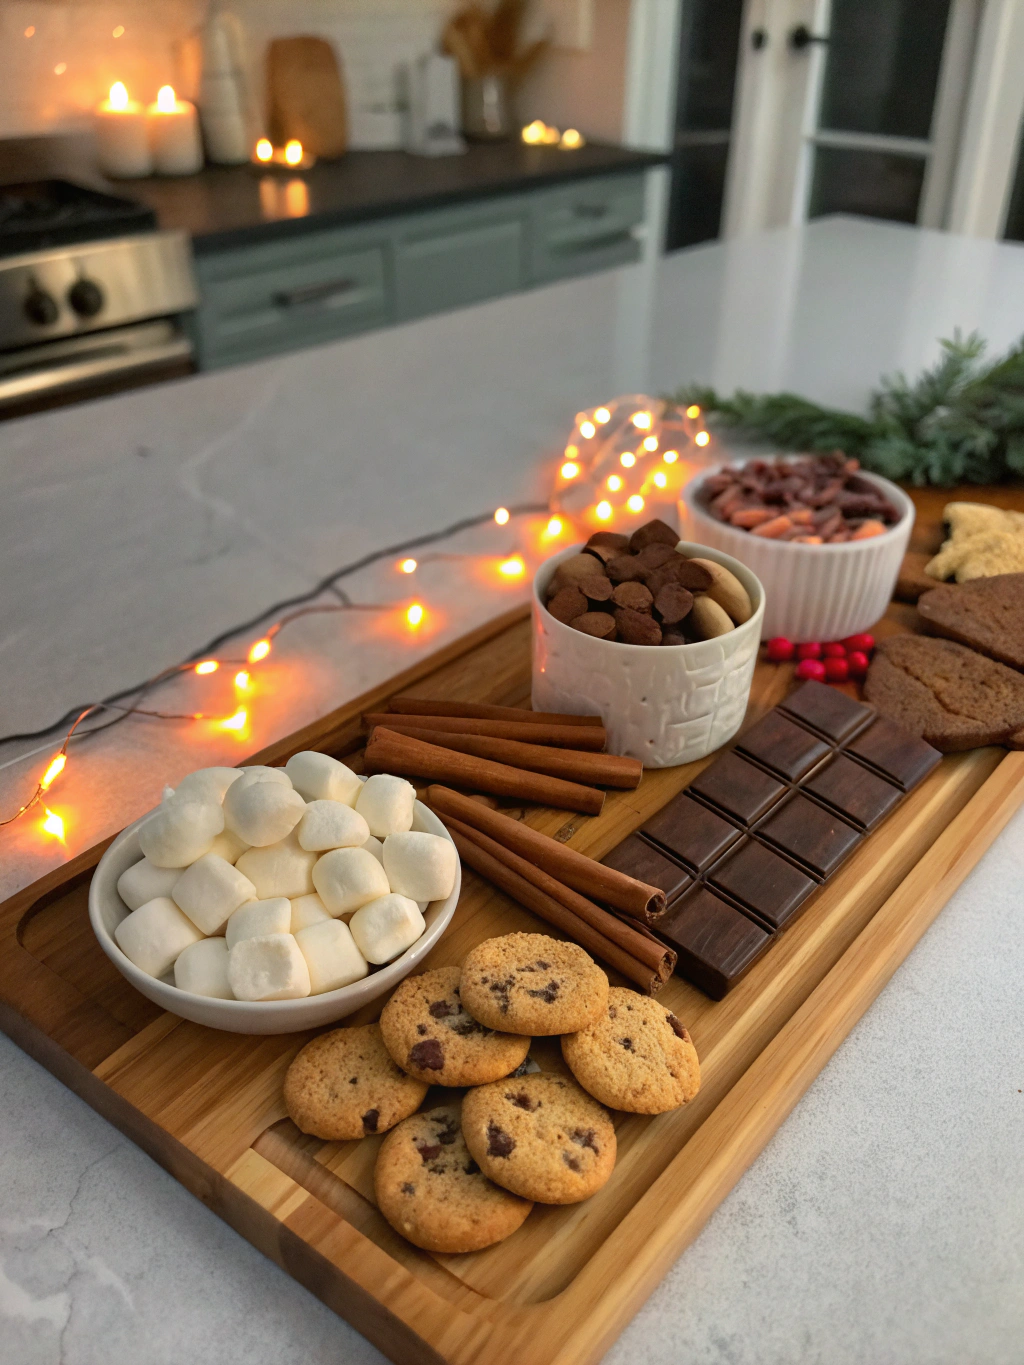
This isn’t about perfection; it’s about variety and layering textures and flavors. Think beyond the standard marshmallows!
- Hot Chocolate Base: Your favorite kind! (Powdered, homemade from scratch, or even fancy Belgian chocolate shavings – we won’t judge!) Make about 4-6 servings.
- Marshmallows: Classic mini marshmallows, gourmet flavored marshmallows (salted caramel, vanilla bean), large roasting marshmallows.
- Cookies: Chocolate chip, biscotti, shortbread, gingerbread, snickerdoodles – a mix offers different textures. About 12-16 cookies total.
- Chocolate Bars: Dark, milk, white chocolate, caramel-filled. Break into chunks.
- Candy: Chocolate covered pretzels, chocolate chunks, mini M&Ms, crushed Oreos, peppermint candies.
- Fruit: Strawberries, raspberries, orange slices (for a hint of citrus!), banana slices (dip in lemon juice to prevent browning).
- Extras for Flavor and Texture: Caramel sauce, fudge sauce, whipped cream, sprinkles, crushed nuts (pecans, walnuts, almonds), flaky sea salt, shredded coconut.
- Optional – For a Boozy Twist: Mini bottles of liqueur (Bailey’s Irish Cream, Kahlúa) or even a bottle of rum or bourbon.
Substitutions & Tweaks: Don’t like nuts? Skip them! No strawberries? Blueberries are great! The key is finding what you enjoy.
Timing: From Prep to Pure Indulgence
- Prep Time: 15-20 minutes – mostly gathering and chopping.
- Hot Chocolate Prep: 5-10 minutes (depending on your chosen method).
- Total Time: 20-30 minutes. That’s less time than it takes to binge-watch an episode of your favorite show!
Step-by-Step Instructions: Building Your Masterpiece
Step 1: Choose Your Board
Select a large cutting board, platter, or baking sheet. The bigger, the better – we want room for all the goodies!
Step 2: Anchor with Chocolate
Strategically place your chocolate bars around the board. These act as the anchors, establishing the general layout.
Step 3: Cookie Placement – Variety is Key!
Distribute your cookies, varying their size and shape. Don’t just dump them all in a pile—arrange them so they’re visually appealing and accessible.
Step 4: Marshmallow Magic
Scatter mini marshmallows liberally, but also include clustered roasting marshmallows for that campfire vibe.
Step 5: Candy Cascade
Drizzle with chocolate and sprinkle candies around the board. Aim for a little bit of color and texture everywhere.
Step 6: Fruitful Addition
Add your fruit, strategically placing vibrant berries and orange slices for pops of color.
Step 7: Sauces & Sprinkles – The Finishing Touch
Drizzle caramel and fudge sauces over sections of the board. Finish with a generous sprinkle of sprinkles, crushed nuts, and a pinch of flaky sea salt. Seriously, the salt elevates the chocolate!
Nutritional Information (Approximate)
(Per Serving – Assuming 1/6th of the board)
- Calories: 600-800 (This is a dessert platter, folks – don’t stress the numbers!)
- Fat: 35-45g
- Sugar: 60-80g
- Protein: 5-7g
These values are estimates and will vary depending on the specific ingredients used. A study published in the Journal of the Academy of Nutrition and Dietetics highlights that enjoying treats in moderation, alongside a balanced diet, is perfectly acceptable and contributes to overall well-being.
Healthier Alternatives for the Recipe
Want to lighten the load (just a little)? Here’s how:
- Dark Chocolate: Opt for dark chocolate (70% cocoa or higher) – it’s lower in sugar and packed with antioxidants.
- Greek Yogurt Dip: Replace the whipped cream with a dollop of Greek yogurt for a protein boost.
- Fruit Focus: Enhance the fruit selection – add more berries, which are lower in sugar than some other fruits.
- Whole Wheat Cookies: Choose whole wheat or oat-based cookies for extra fiber.
- Sugar-Free Options: Utilize sugar-free syrups and toppings if desired.
Serving Suggestions: Elevate the Experience
- Individual Cups: Create mini hot chocolate charcuterie board cups for easy portioning – perfect for kids’ parties!
- Warm, Cozy Setting: Serve alongside a cozy blanket, a good book, and some candlelight.
- Family Fun: Let everyone customize their own mug with the ingredients on the board.
- Thematic Night: Pair it with a Christmas movie marathon for a true holiday vibe.
Common Mistakes to Avoid
- Overcrowding: Avoid piling everything on top of each other. Spacing creates visual appeal and allows each element to shine. Research shows that negative space improves aesthetic perception.
- Not Enough Variety: A platter full of just marshmallows is…sad. Aim for a mix of textures and flavors.
- Forgetting the Sauces: Sauces are essential. They tie everything together and add that extra layer of indulgence.
- Skipping the Salt: Seriously, don’t skip the flaky sea salt. It enhances the chocolate flavor in ways you won’t believe!
Storing Tips for the Recipe
- Leftover Ingredients: Store leftover cookies and candies in airtight containers at room temperature. Fruit should be refrigerated.
- Prepping Ahead: You can prep many of the ingredients (chopping fruit, breaking chocolate bars) a day in advance.
- Board Storage: Don’t store the entire assembled board – it will get soggy. This is best enjoyed fresh!
Conclusion: Your Hot Chocolate Dream Awaits
Building a hot chocolate charcuterie board is more than just assembling ingredients—it’s about creating a moment. This delightful dessert platter is perfect for cozy nights in, holiday gatherings, or simply treating yourself to something special. So, grab your favorite hot chocolate, gather your goodies, and get ready to wow your taste buds. This is an instant mood booster, guaranteed!
Ready to unleash your inner dessert artist? Try building your own hot chocolate charcuterie board today and share your creations with us on social media! Don’t forget to check out our other holiday treat recipes [link to related post 1] and easy Christmas party food ideas at [link to related post 2]. Happy grazing!
FAQs: Your Burning Questions Answered
Q: Can I make the hot chocolate ahead of time?
- A: Absolutely! You can prepare the hot chocolate and keep it warm in a slow cooker or insulated thermos. Just be sure to adjust the temperature to avoid scorching.
Q: Is this suitable for kids?
- A: Definitely! Kids love choosing their own toppings. Just be mindful of any allergies and avoid small candies that could be a choking hazard for very young children.
Q: I don’t have a large cutting board – can I use a smaller one?
- A: Yes! Just adjust the ingredients accordingly. A smaller board is a great option for a smaller gathering or individual indulgence.
Q: Can I freeze any of the components?
- A: Not the fully assembled board, unfortunately. However, you can freeze pre-made cookies or whipped cream for later use.
Disclaimer: Nutritional information is an estimate and may vary based on specific ingredients and portion sizes.
