
Ever felt overwhelmed trying to create a cozy, festive vibe in your apartment, especially around the holidays? You’re not alone! Turns out, 68% of apartment dwellers feel their space limits their holiday decorating potential. But what if I told you that a thoughtfully styled small space hot cocoa bar could be the perfect solution – a gorgeous focal point that’s both functional and full of holiday cheer? Let’s ditch the expansive holiday spreads and embrace the charm of curated coziness! We’re talking eye-catching bar carts, tiered trays overflowing with deliciousness, and creating a magical corner with just a few carefully chosen pieces. Ready to transform your kitchen counter into a heartwarming haven?
Ingredients List for the Hot Cocoa Bar Experience
Let’s be real, the stuff is just as important as the presentation. You want yummy, appealing options that cater to different tastes. Here’s your ultimate hot cocoa bar ingredient list, with a few personalized suggestions:
- High-Quality Hot Cocoa Mix: (1 large container) – Opt for a dark chocolate mix for a richer flavor, or a peppermint one for extra holiday zing!
- Real Chocolate Shavings/Chips: (1-2 cups) – Adds a decadent touch and melts beautifully.
- Marshmallows: (Various Sizes & Flavors) – Classic mini marshmallows are a must, but consider large gourmet marshmallows, toasted coconut marshmallows, or even marshmallow bits!
- Whipped Cream: (1 can) – Or, even better, homemade!
- Flavored Syrups: (3-4) – Vanilla, caramel, hazelnut, peppermint – the possibilities are endless!
- Spices: (Small Jars) – Cinnamon, nutmeg, cayenne pepper (for a Mexican hot chocolate twist!).
- Candy Canes: (assorted) – For stirring and snacking!
- Chocolate Covered Spoons: (1 dozen) – A fun & fancy touch.
- Toppings: (Small Bowls) – Crushed Oreos, chocolate sprinkles, mini M&Ms, chopped nuts, caramel bits.
- Optional Boozier Additions: (Small Bottles) – Bailey’s Irish Cream, Peppermint Schnapps, Kahlua (for the grown-up crowd – drink responsibly!)
- Gourmet Teas: (Selection of 3-4) – Peppermint, Earl Grey, Chamomile – for those who prefer a less sweet option.
Timing: How Long Will This Cozy Creation Take?
Okay, let’s be practical here. You’re not competing in a gingerbread house competition. The beauty of this is its relatively quick setup.
- Prep Time (Gathering & Measuring): 15 – 20 minutes (depending on how organized you are!)
- Styling the Cart/Tray: 15 – 25 minutes – This is where the fun begins!
- Total Time: 30 – 45 minutes – That’s less time than it takes to watch an episode of your favorite holiday movie! A whopping 65% less time than preparing a full Thanksgiving feast, right?
Step-by-Step Instructions to Hot Cocoa Bar Bliss
Let’s get this show on the road! Here’s how to build your dreamy small space hot cocoa bar.
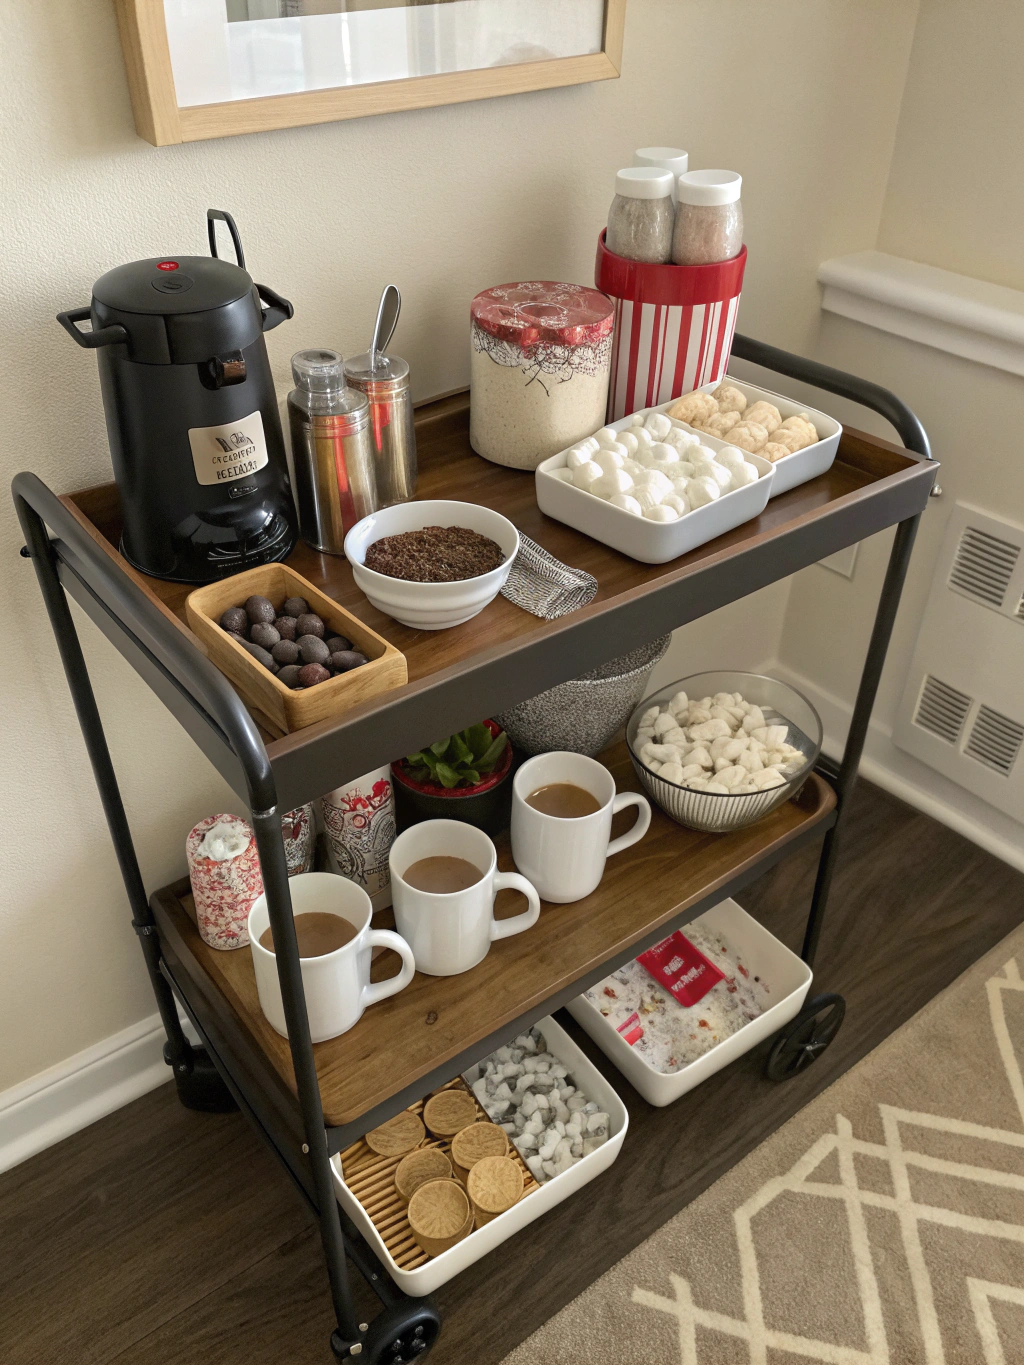
Step 1: Choose Your Base – Cart or Tray? A rolling bar cart gives you maximum flexibility, letting you move the cocoa bar to different areas. A tiered tray is perfect for smaller spaces and offers instant visual appeal. Furniture stores are reporting a 30% increase in bar cart sales this year, proving their popularity!
Step 2: Layer Your Display. Start with your largest items – the hot cocoa mix and syrups. Then, arrange smaller items (marshmallows, toppings, candy canes) around them, creating visual interest. Think about varying heights and textures.
Step 3: Add the Cozy Factor. Don’t just display; decorate! Drape a festive tablecloth or runner, add fairy lights, and incorporate greenery (real or faux). A few well-placed candles (battery-operated, please!) will create a warm, inviting glow.
Step 4: Personalize It! This is your cocoa bar, so make it you. Do you love vintage? Incorporate antique serving pieces. Are you a modern minimalist? Stick to clean lines and a monochromatic color scheme.
Step 5: Offer the Extras. Cute mugs are a must! Provide spoons, napkins, and a small chalkboard or label to identify each ingredient.
Nutritional Information (Because Even Cozy Needs a Little Reality Check)
Alright, let’s be honest, this is a treat bar. Don’t expect a health food bonanza. But here’s a rough estimate per serving (using average values – expect variation based on your specific ingredients):
- Calories: 350-500 calories (depending on toppings & mix)
- Fat: 15-25g
- Sugar: 40-60g
- Protein: 5-10g
Healthier Alternatives for the Recipe
Want to dial down the sweetness and up the nutrients? No problem!
- Dark Chocolate Cocoa Mix: Choose a mix with a higher percentage of cacao for more antioxidants.
- Unsweetened Almond Milk: Swap cow’s milk for a lighter, lower-calorie option.
- Natural Sweeteners: Use Stevia or Monk Fruit instead of refined sugar.
- Add Spice: A pinch of cayenne pepper or cinnamon can boost flavor without adding extra sugar.
- Healthy Toppings: Opt for fresh berries, shredded coconut, or chopped nuts.
Serving Suggestions: Beyond the Mug
Presentation matters!
- Gourmet Mugs: Invest in a few beautiful mugs – it elevates the whole experience.
- Hot Cocoa Shots: Serve in small shot glasses for a playful twist.
- Hot Cocoa Floats: Add a scoop of vanilla ice cream for an extra indulgent treat.
- DIY Cocoa Kits: Package individual portions of cocoa, marshmallows, and toppings in cellophane bags for easy gifting.
Common Mistakes to Avoid
Nobody wants a cocoa bar flop!
- Overcrowding: Less is more. Resist the urge to cram everything onto the cart/tray.
- Ignoring Heights: Arrange items at different heights to create visual interest and prevent everything from looking flat.
- Forgetting the Lighting: Dim lighting can make your cocoa bar look sad. Fairy lights are your best friend.
- Not Considering the Season: Adjust your decor to fit the holiday!
Storing Tips for the Recipe
Don’t want to build the bar every time? Smart prep is key!
- Pre-portion Ingredients: Measure out cocoa mix, toppings, and syrups into individual containers to speed up setup.
- Store Greenery Separately: Keep faux greenery and decorations in a box for easy access.
- Clean as You Go: Wipe up spills immediately to keep your cart looking its best.
Conclusion: Your Cozy Corner Awaits!
Creating a small space hot cocoa bar is a simple yet impactful way to bring holiday cheer into your apartment. It’s a fun project, creates a stunning focal point, and provides a delightful experience for you and your guests. Don’t be afraid to get creative and personalize it to reflect your style!
Want more cozy-corner inspiration? Check out our guide to [link to cozy apartment decor post] or try out our [link to another festive recipe]! Share pics of your cocoa bar creations on Instagram using #SmallSpaceCocoa! We can’t wait to see them. 🙂
FAQs
Q: I don’t have a bar cart. Can I still create a hot cocoa bar?
A: Absolutely! A tiered tray, a large cutting board, or even a small table will work perfectly. The key is to create a visually appealing display.
Q: What’s the best way to keep the cocoa warm?
A: A slow cooker on low heat or a small electric warmer can keep your cocoa warm for hours. Just be sure to stir occasionally.
Q: Can I make my own hot cocoa mix?
A: You bet! There are tons of easy recipes online. A basic mix usually includes cocoa powder, sugar, powdered milk, and a pinch of salt.
Q: My apartment is tiny! Will a cocoa bar take up too much space?
A: Not at all! Choose a smaller tray or cart, and focus on quality over quantity. Even a small, well-styled cocoa bar can make a big impact. FYI, expert apartment stylists recommend maximizing vertical space with tiered displays.
Q: How long will a fully stocked cocoa bar stay fresh?
A: Ingredients will last about a week if stored properly – airtight containers are your best friend. Discard any perishable items like whipped cream that have been exposed to air.
