
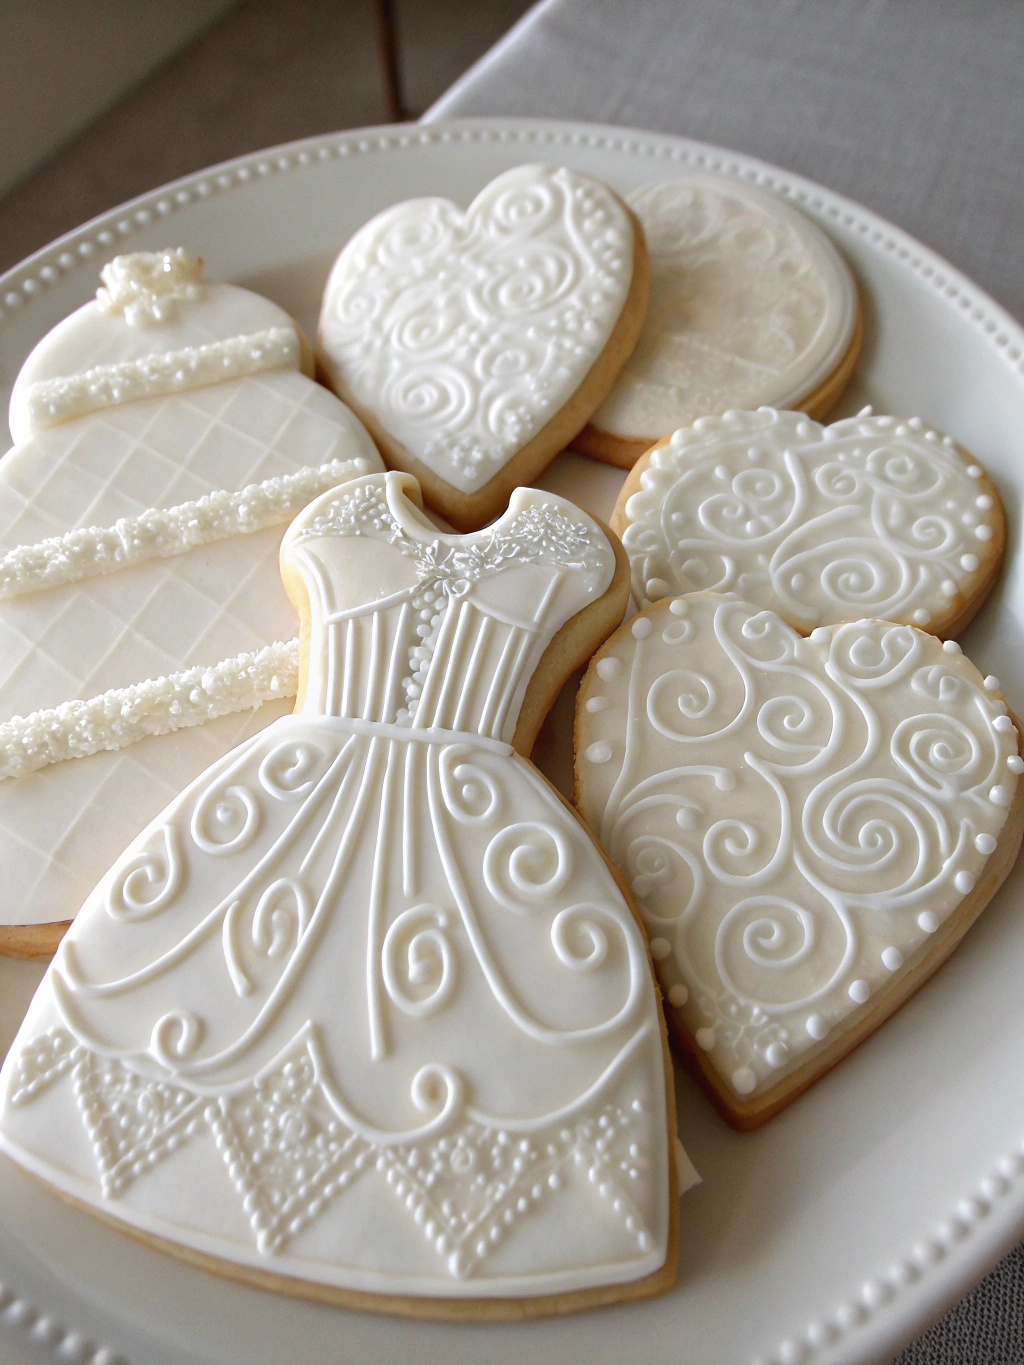
Ever wondered how those incredibly elegant wedding treats, the ones that look like miniature works of art, are actually made? It’s not magic (though sometimes it feels like it!). Today, we’re diving deep into the world of wedding sugar cookies, specifically focusing on that dreamy, sophisticated white-on-white aesthetic. Forget the complicated tutorials you’ve seen; this guide breaks it down so even a novice baker can create stunning wedding sugar cookies for bridal showers, engagement parties, or as unforgettable wedding favors. We’re aiming for those “wow” factor cookies, and who doesn’t want to be that baker?
Ingredients List
Let’s gather our supplies! This recipe focuses on achieving that beautiful, clean white look, so ingredient quality truly matters.
- 2 1/4 cups (281g) All-Purpose Flour: Unbleached is preferred for a slightly more textured cookie.
- 1 teaspoon Baking Powder: For a little lift and a softer texture. Don’t skip it!
- 1/2 teaspoon Salt: Balances the sweetness and enhances flavors.
- 1 cup (226g) Unsalted Butter, softened: Really softened, but not melted. Room temperature is key – it’ll make a huge difference!
- 3/4 cup (150g) Granulated Sugar: We want that classic sweetness.
- 1 Large Egg: Provides structure and richness.
- 1 teaspoon Vanilla Extract: Use pure vanilla extract, not imitation! You can taste the difference.
- Royal Icing: (See instructions below for a flawless white recipe – it’s the real secret!)
- 4 cups (480g) Powdered Sugar, sifted (Sifting is non-negotiable!)
- 1/2 cup (120ml) Egg Whites, plus 1 Tbsp water
- 1/2 teaspoon Cream of Tartar: Stabilizes the icing and prevents it from drying out too quickly.
- White Food Coloring (Gel food coloring is best!) – adjust quantity for desired consistency.
Timing
Alright, let’s talk time. Baking isn’t about rushing! Here’s a breakdown:
- Dough Preparation: 20 minutes
- Chilling Time: At least 2 hours (or even overnight – highly recommended for easier rolling and handling!)
- Baking Time: 8-10 minutes per batch, depending on size & oven
- Royal Icing Preparation: 15 minutes
- Decorating Time: This is where it varies wildly – allow at least 1-2 hours, and maybe more depending on your design complexity. Think about how intricate you want your wedding sugar cookies to look!
- Total Time: Roughly 3 – 5+ hours. It’s a project! But worth it, trust me. 90 minutes of active work, with long chilling/drying times.
Step-by-Step Instructions
Let’s get baking!
Step 1: Making the Sugar Cookie Dough
- Dry Ingredients: In a medium bowl, whisk together the flour, baking powder, and salt. This combines them evenly.
- Cream Butter & Sugar: In a large bowl (or using a stand mixer), cream together the softened butter and granulated sugar until light and fluffy. This takes about 3-5 minutes – really beat it! It’s crucial for a tender cookie.
- Add Egg & Vanilla: Beat in the egg until well combined, then stir in the vanilla extract.
- Combine Wet & Dry: Gradually add the dry ingredients to the wet ingredients, mixing on low speed until just combined. Don’t overmix! That’s a recipe for tough cookies.
Step 2: Chilling the Dough
- Wrap & Chill: Wrap the dough tightly in plastic wrap and refrigerate for at least 2 hours, or preferably overnight. This relaxes the gluten, preventing the cookies from spreading too much during baking. I always chill overnight – it’s a game-changer.
Step 3: Rolling & Cutting
- Preheat & Prep: Preheat your oven to 375°F (190°C). Line a baking sheet with parchment paper.
- Roll Out the Dough: On a lightly floured surface, roll out the chilled dough to about 1/8 inch thickness.
- Cut Out Shapes: Use your favorite wedding-themed cookie cutters (hearts, rings, doves – you name it!) to cut out the cookies.
- Transfer to Baking Sheet: Carefully transfer the cut-out cookies to the prepared baking sheet.
Step 4: Baking the Cookies
- Bake: Bake for 8-10 minutes, or until the edges are lightly golden.
- Cool Completely: Let the cookies cool on the baking sheet for a few minutes before transferring them to a wire rack to cool completely. This is essential before icing.
Step 5: Royal Icing Magic
- Whisk Egg Whites: In a clean mixing bowl, beat the egg whites and cream of tartar until soft peaks form.
- Add Powdered Sugar: Gradually add the powdered sugar, 1 cup at a time, beating on low speed after each addition.
- Adjust Consistency: Add water, one tablespoon at a time, until you reach a piping consistency—the icing should be smooth and flow easily off your spatula but not be too runny.
- Add White Food Coloring: Add white gel food coloring a tiny bit at a time until you achieve a brilliant, opaque white. Be patient – a little goes a long way!
Step 6: Decorating (The Fun Part!)
- Outline & Fill: Use a small round piping tip to outline your cookies with royal icing, then use a larger tip to fill them in.
- Add Details: Once the base layer is dry (about 30-60 minutes), add any additional details like dots, lines, or patterns. Get creative!
- Let Dry Completely: Allow the icing to dry completely (at least 6-8 hours, or overnight) before packaging or serving.
Nutritional Information (Estimated)
Serving size: 1 cookie
- Calories: 150-200 (depending on size)
- Fat: 8-12g
- Saturated Fat: 5-8g
- Cholesterol: 15-20mg
- Sodium: 50-75mg
- Carbohydrates: 18-25g
- Sugar: 12-18g
- Protein: 1-2g
Note: Nutritional information is an estimate and may vary based on ingredient brands and serving size.
Healthier Alternatives for the Recipe
Want to lighten things up a bit? Here’s how:
- Reduce Sugar: Use a sugar substitute like erythritol for a lower-calorie option. You might need to adjust liquid slightly.
- Whole Wheat Flour: Substitute up to 1/2 of the all-purpose flour with whole wheat pastry flour for added fiber.
- Healthy Fats: Consider using avocado oil or coconut oil instead of butter.
Serving Suggestions
These wedding sugar cookies are perfect on their own, but here are some ideas to elevate them:
- Cookie Towers: Stack them high on a cake stand for a stunning centerpiece.
- Gift Boxes: Package them in elegant boxes tied with ribbons for beautiful wedding favors.
- With Tea or Coffee: Offer them alongside a selection of teas or coffees for a delightful afternoon treat. IMO, a lavender earl grey pairs perfectly!
Common Mistakes to Avoid
Let’s troubleshoot!
- Overmixing the Dough: Leads to tough cookies. Mix until just combined.
- Not Chilling the Dough: Results in flat, greasy cookies. Don’t skip the chilling step.
- Icing Too Runny: Make sure your royal icing is the right consistency; add more powdered sugar if needed.
- Rushing the Drying Time: The icing needs to be completely dry before packaging or handling.
Storing Tips for the Recipe
- Un-iced Cookies: Store in an airtight container at room temperature for up to 3 days.
- Iced Cookies: Store in an airtight container at room temperature for up to 2 days. Humidity is your enemy!
- Freeze Dough: Freeze the cookie dough for up to 2 months. Thaw in the refrigerator overnight before rolling.
Conclusion
Creating beautiful wedding sugar cookies is all about the details! By following these steps and paying attention to the little things – chilling the dough, sifting the powdered sugar, achieving the perfect icing consistency – you can impress your guests with elegant, delicious treats. Now, get baking!
Ready to impress with your cookie-decorating skills? Share your creations with us on social media using #WeddingSugarCookies! What other treats are you baking for your upcoming events? Let us know in the comments below – we LOVE hearing from you! Check out our other dessert tutorials for more baking inspiration!
FAQs
Q: Can I use different cookie cutters?
A: Absolutely! While we’re focusing on wedding themes, feel free to use any cookie cutters you like. Hearts, flowers, or even animals can be perfect for other celebrations.
Q: My royal icing is cracking. What did I do wrong?
A: This usually means your icing dried too quickly. Try adding a tiny bit more water to the icing next time to slow down the drying process.
Q: Can I make these cookies gluten-free?
A: Yes! Substitute the all-purpose flour with a gluten-free flour blend formulated for baking. Be sure to check baking times and adjust accordingly.
Q: How long does it take for royal icing to dry completely?
A: Ideally, allow a minimum of 6-8 hours, but overnight drying is recommended for the best results and to prevent sticky cookies.
